Using MailHog SMTP Server With ColdFusion And Docker
At work, we've been using an email testing tool called MailHog. I first learned about MailHog from my co-worker, Shawn Grigson, who added it to our Lucee CFML docker-compose.yaml file some years ago. MailHog provides both an SMTP server for receiving emails and a rather elegant user interface (UI) for reading and deleting said emails. Yesterday, I went to add MailHog into my personal blog's ColdFusion Docker setup; and, I was blown away at just how easy it was to get going.
The MailHog Docker image, mailhog/mailhog, exposes two ports: 1025 for receiving emails and 8025 for exposing the email management UI. In my docker-compose.yaml file, getting MailHog up and running is literally as simple as using this image and exposing the two ports on the host machine.
In the following docker-compose.yaml file, I am defining an Adobe ColdFusion 2021 server using the official Adobe Docker image. And, I'm defining the MailHog server. Note that I am installing the ColdFusion mail module, which is required in order to consume the smtpServerSettings property in our Application.cfc:
version: "2.4"

services:

  # Our ColdFusion server.
  cfml:
    image: "adobecoldfusion/coldfusion2021:2021.0.5"
    ports:
      - "8500:8500"
    environment:
      acceptEULA: "YES"
      password: "password"
      installModules: "mail:2021.0.05.330109"
    volumes:
     - "./wwwroot:/app"
    depends_on:
      - "mailhog"

  # Our SMTP server.
  mailhog:
    image: "mailhog/mailhog"
    ports:
      # - "1025:1025" # SMTP server that ColdFusion will send mail to.
      - "8025:8025" # Web UI that developers can access to check sent-mail.
While the MailHog Docker container exposes port 1025 for the SMTP server, I don't actually have to expose that port on the host machine. The cfml server and the mailhog server live on the same network and will be able to communicate seamlessly without that port being exposed to me, the developer. I only need 8025 exposed for the email management UI.
Running docker-compose up now brings up the MailHog server followed by the Adobe ColdFusion server. Our ColdFusion application leverages MailHog by way of the SMTP server settings in the Application.cfc file:
component
	output = false
	hint = "I define the application settings and event handlers."
	{

	// Define the application settings.
	this.name = "MailHogInColdFusion";
	this.applicationTimeout = createTimeSpan( 1, 0, 0, 0 );
	this.sessionManagement = false;
	this.setClientCookies = false;

	// For our SMTP server, we're going to use the MailHog container. The name of the
	// mail server corresponds to the name of the service in our Docker Compose file.
	this.smtpServerSettings = {
		server: "mailhog:1025"
	};

}
There is no username or password required for the MailHog SMPT server - it's just a local development tool. As such, all we have to do is provide the server name and port. Notice that the name of the server is the same as the service block defined in our docker-compose.yaml file.
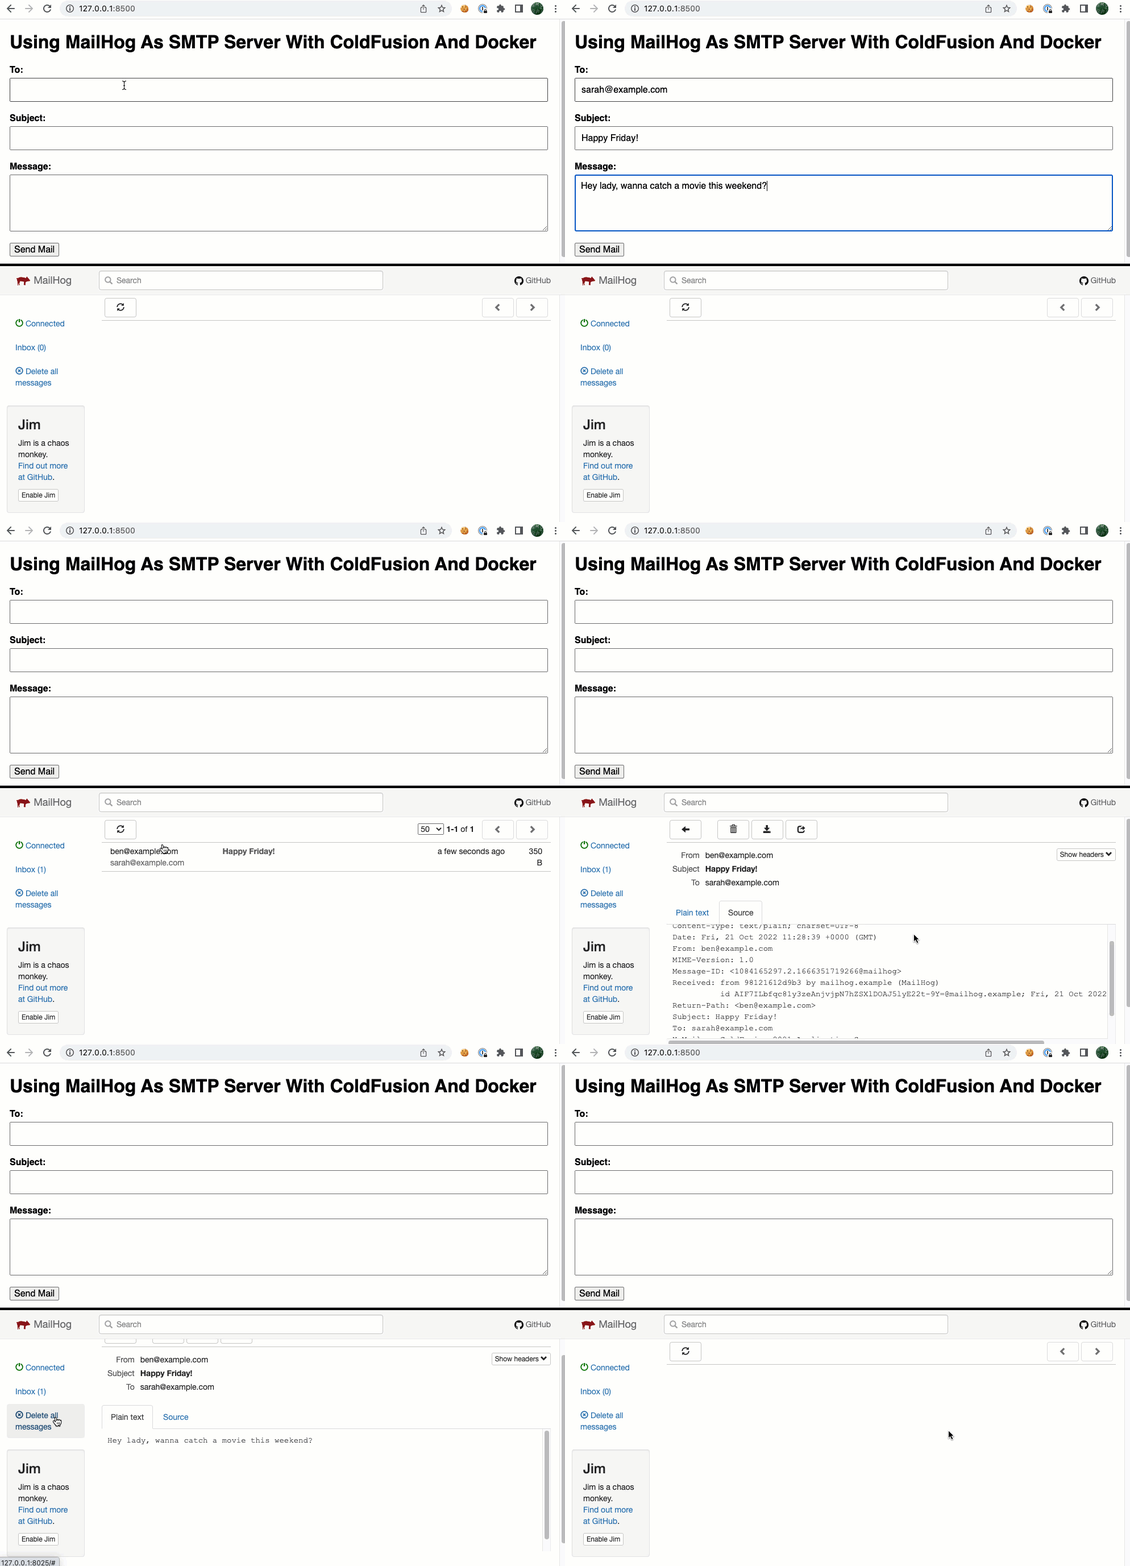
To test this, I set up an old-school <frameset> that places my ColdFusion code next to the MailHog management UI:
<!doctype html>
<html>
<frameset rows="50%,50%" border="5" bordercolor="#000000">
	<!--- Our ColdFusion mail form. --->
	<frame src="./send.cfm" />
	<!--- Our running MailHog container. --->
	<frame src="http://127.0.0.1:8025" />
</frameset>
</html>
And then I created a very simple interface for sending mail via the CFMail tag:
<cfscript>

	// Setupt our default form values.
	param name="form.submitted" type="boolean" default=false;
	param name="form.to" type="string" default="";
	param name="form.subject" type="string" default="";
	param name="form.message" type="string" default="";

	if ( form.submitted ) {

		new Mail()
			.setFrom( "ben@example.com" )
			.setTo( form.to )
			.setSubject( form.subject )
			.setBody( form.message )
			.setSpoolenable( false ) // Send immediately.
			.send()
		;

		location( url = cgi.script_name, addToken = false );

	}

</cfscript>
<cfoutput>

	<!doctype html>
	<html lang="en">
	<head>
		<meta charset="utf-8" />
		<link rel="stylesheet" type="text/css" href="./send.css" />
	</head>
	<body>

		<h1>
			Using MailHog As SMTP Server With ColdFusion And Docker
		</h1>

		<form method="post">

			<label for="to">To:</label>
			<input id="to" type="text" name="to" />

			<label for="subject">Subject:</label>
			<input id="subject" type="text" name="subject" />

			<label for="message">Message:</label>
			<textarea id="message" name="message"></textarea>

			<button type="submit" name="submitted" value="true">
				Send Mail
			</button>

		</form>

	</body>
	</html>

</cfoutput>
And that's all there is to it! If we open up this ColdFusion application and start sending emails, you'll see that they instantly show up in the MailHog email management UI:
How cool is that?! And, with MailHog in place in my local ColdFusion development environment, I never have to worry about accidentally sending email to real users - everything gets caught and managed locally.
Want to use code from this post? Check out the license.


Reader Comments
Great Ben! Way better than my approach using a postfix docker and sending real e-mails to myself.
@Michael,
10000% I used to just have my local dev environment hooked up to my real mail service (PostMark). And was just keeping fingers-crossed that I never messed it up. Now, worry-free development, always!
Great stuff Ben,
I've used this Node package in the past. And there's a Docker image as well.
https://www.npmjs.com/package/maildev
Laurence
@Laurence,
Oh very cool, so nice to see that there are multiple options along the same lines. And loving the fact that services like this are making it so easy to plug-and-play with Docker!