Replacing Transparent Image Backgrounds With GraphicsMagick And Lucee CFML 5.2.9.31
At InVision, one of the things that we do when generating thumbnails is replacing transparent image backgrounds with a solid color (typically white). We do this because the design of the page that renders thumbnails is almost never designed to expect any image transparency. As such, I wanted to take a quick look at how I would replace (or color-in) a transparent background using GraphicsMagick and Lucee CFML 5.2.9.31.
At first, I tried to accomplish this using the -opaque operation that I used when annotating an image using GraphicsMagick and Lucee CFML. For example, to replace the transparent background with #262626, I tried the following:
-fill #262626 -opaque transparent
This "worked"; but, unfortunately, it ruined the anti-aliasing around borders because it replaced any partially-transparent pixel with the given color, leaving borders looking jagged.
After some Googling, I came across a SuperUser forum post, which suggested I try the -extent operation. According to the GraphicsMagick documentation, the -extent operation:
composite(s) image on background color canvas image
This is exactly what I want: to composite the current image over a new image with a given background color. That would allow the background color to show through any transparent - or partially-transparent - pixels in the source image.
The -extent operation takes a "geometry" which is intended to alter the dimensions of the resultant image. However, if you use 0x0 as the geometry, the -extent operation appears to use the dimensions of the source image. As such, we can use the following command to replace a transparent background with a given color:
-background #262626" -extent 0x0
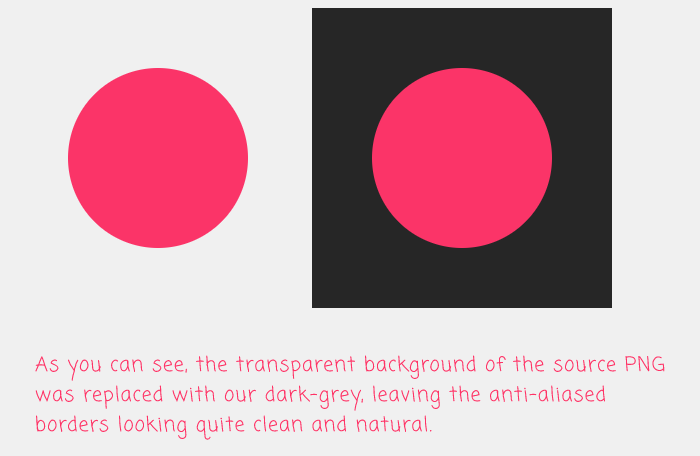
To see this in action, I created a simple transparent PNG that contains a circle. Then, using GraphicsMagick and Lucee CFML, I replace that transparent background:
<cfscript>

	// For the demo, copy a PNG with a transparent background to the demo directory.
	fileCopy( "../images/circle.png", "./in.png" );

	gm([
		// We're going to use the Convert utility to remove the transparent background.
		"convert",

		// We want to be EXPLICIT about which input reader GraphicsMagick should use.
		// If we leave it up to "automatic detection", a malicious actor could fake
		// file-type and potentially exploit a weakness in a given reader.
		// --
		// READ MORE: http://www.graphicsmagick.org/security.html
		( "png:" & expandPath( "./in.png" ) ),

		// Set the background color to be used during the EXTENT operation.
		"-background ##262626",

		// Use extent to composite the given image over a background of the given color
		// (defined by -background). For non-zero geometry values, the EXTENT command
		// would have resize the generated image; however for zero values, it appears to
		// use the size of the source image.
		"-extent 0x0",

		// Remove any alpha-channel information now that we've filled-in the background.
		"+matte",

		expandPath( "./out.png" )
	]);

	// ------------------------------------------------------------------------------- //
	// ------------------------------------------------------------------------------- //

	/**
	* I execute the given options against the GM (GraphicsMagick) command-line tool. If
	* there is an error, the error is dumped-out and the processing is halted. If there
	* is no error, the standard-output is returned.
	*
	* NOTE: Options are flattened using a space (" ").
	*
	* @options I am the collection of options to apply.
	*/
	public string function gm( required array options ) {

		execute
			name = "gm"
			arguments = options.toList( " " )
			variable = "local.successResult"
			errorVariable = "local.errorResult"
			timeout = 5
		;

		// If the error variable has been populated, it means the CFExecute tag ran into
		// an error - let's dump-it-out and halt processing.
		if ( local.keyExists( "errorVariable" ) && errorVariable.len() ) {

			dump( errorVariable );
			abort;

		}

		return( successResult ?: "" );

	}

</cfscript>

<!---
	Add a background color to the image so we can see where the transparent portions of
	the image exist.
--->
<body style="background-color: #f0f0f0 ;">

	<img src="./in.png" width="300" />
	<img src="./out.png" width="300" />

</body>
And, when we run this ColdFusion code, we get the following output:

As you can see, the transparent portion of the PNG image was replaced with our #262626 value. But, by using the -extent operation, it allows the anti-aliased border of the circle to remain clean and natural since the compositing of the PNG over the background allows the background color to partially-penetrate the partially-transparent pixels.
Anyway, just another quick exploration of how I might use the GraphicsMagick command-line utility to replace the image manipulation that I'm currently doing with the CFImage tag in ColdFusion.
Want to use code from this post? Check out the license.

Reader Comments
This is awesome. I have wondered how to do this for many years. I now have a really good reason to use GM!
@Charles,
Very glad to be able to point out a use-case :D