Creating A Tiled Image Background With TileImage()
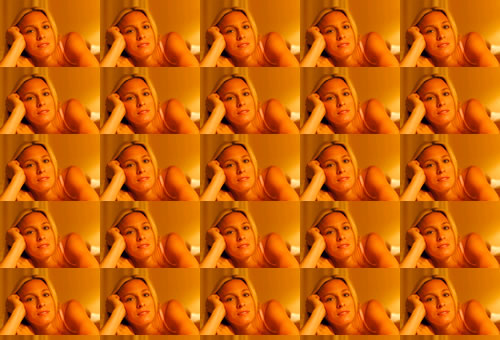
I've added a new function, TileImage(), to Ray Camden's and my ImageUtils.cfc. This new function will completely tile the given graphic onto the given ColdFusion image canvas. Think of this as a repeated background image on a web site or a background pattern on a FireWorks shape. The method looks like this:
TileImage( Image, TileImage [, X [, Y ]] )
Image
The image onto which we are tiling the other image.
TileImage
The image that we are going to be tiling onto our canvas
X
The optional X coordinate from which we are going to start tiling. This defaults to zero but can be set to positive or negative number.
Y
The optional Y coordinate from which we are going to start tiling. This defaults to zero but can be set to positive or negative number.
Let's take a quick look at this baby in action:
<!--- Create imageUtils.cfc instance. --->
<cfset objUtils = CreateObject( "component", "imageUtils" ).Init() />

<!--- Create a blank canvas. --->
<cfset objImage = ImageNew( "", 500, 340, "rgb" ) />

<!--- Read in the image that we are going to tile. --->
<cfimage
	action="read"
	source="./subject.jpg"
	name="objTile"
	/>

<!--- Scale the tile image so that it will tile better. --->
<cfimage
	action="resize"
	source="#objTile#"
	height="20%"
	width="20%"
	name="objTile"
	/>

<!---
	Tile the image onto our canvas. You can supply an optional
	starting X and Y coordniate for the pasting operations; I
	have included them in this method call and just set them
	to zero (same as if I didn't include them at all).
--->
<cfset objUtils.TileImage(
	objImage,
	objTile,
	0,
	0
	) />

<!--- Write to broser. --->
<cfimage
	action="writetobrowser"
	source="#objImage#"
	/>
Here, we are creating a blank canvas and then tiling our subject.jpg image onto it. We are scaling down the tile image just so that it tiles, otherwise it would be roughly the same size as our blank canvas. Running the above code, we get the following output:

Here is the code for this ColdFusion user define function for image manipulation:
<cffunction
	name="TileImage"
	access="public"
	returntype="any"
	output="false"
	hint="Takes your ColdFusion image object and tiles the given image over it.">

	<!--- Define arguments. --->
	<cfargument
		name="Image"
		type="any"
		required="true"
		hint="The ColdFusion image onto which we are going to tile our graphic."
		/>

	<cfargument
		name="TileImage"
		type="any"
		required="true"
		hint="The image that we are going to tile onto our ColdFusion image."
		/>

	<cfargument
		name="X"
		type="numeric"
		required="false"
		default="0"
		hint="The X point at which we are going to start our tiling."
		/>

	<cfargument
		name="Y"
		type="numeric"
		required="false"
		default="0"
		hint="The Y point at which we are going to start our tiling."
		/>

	<!--- Define the local scope. --->
	<cfset var LOCAL = {} />


	<!---
		Check to see what kind of value the tile image is.
		If it is not an image, then we have to create an
		image with it such that we can more easily get the
		height and width dimensions.
	--->
	<cfif NOT IsImage( ARGUMENTS.TileImage )>

		<!--- Read in the image file. --->
		<cfimage
			action="read"
			source="#ARGUMENTS.TileImage#"
			name="ARGUMENTS.TileImage"
			/>

	</cfif>


	<!--- Get the image dimensions. --->
	<cfset LOCAL.ImageDimensions = {
		Width = ImageGetWidth( ARGUMENTS.Image ),
		Height = ImageGetHeight( ARGUMENTS.Image )
		} />

	<!--- Get the tile image dimensions. --->
	<cfset LOCAL.TileDimensions = {
		Width = ImageGetWidth( ARGUMENTS.TileImage ),
		Height = ImageGetHeight( ARGUMENTS.TileImage )
		} />


	<!---
		Now that we have our dimensions, we need to figure
		out where we need to start tiling. We need to make
		sure that we start at or before ZERO in both of
		the axis.
	--->
	<cfset LOCAL.StartCoord = {
		X = ARGUMENTS.X,
		Y = ARGUMENTS.Y
		} />

	<!--- Find the starting X coord. --->
	<cfloop condition="(LOCAL.StartCoord.X GT 0)">

		<!--- Subtract the width of the tiled image. --->
		<cfset LOCAL.StartCoord.X -= LOCAL.TileDimensions.Width />

	</cfloop>

	<!--- Find the starting Y coord. --->
	<cfloop condition="(LOCAL.StartCoord.Y GT 0)">

		<!--- Subtract the width of the tiled image. --->
		<cfset LOCAL.StartCoord.Y -= LOCAL.TileDimensions.Height />

	</cfloop>


	<!---
		ASSERT: At this point, our StartCoord has the {X,Y}
		point at which we need to begin our tiling.
	--->


	<!---
		Set the current coordindate of pasting to be the
		start point that we calcualted above. We will be
		updating this value as we tile the image.
	--->
	<cfset LOCAL.PasteCoord = StructCopy( LOCAL.StartCoord ) />

	<!---
		Now, we want to keep looping until the Y coord
		of our pasting is greater than the heigh of our
		target ColdFusion image.
	--->
	<cfloop
		index="LOCAL.PasteCoord.Y"
		from="#LOCAL.StartCoord.Y#"
		to="#LOCAL.ImageDimensions.Height#"
		step="#LOCAL.TileDimensions.Height#">

		<!---
			As we loop over the Y coordinate, we want to
			also keep looping until our X pasting coordinate
			goes beyond the width of the target ColdFusion
			image.
		--->
		<cfloop
			index="LOCAL.PasteCoord.X"
			from="#LOCAL.StartCoord.X#"
			to="#LOCAL.ImageDimensions.Width#"
			step="#LOCAL.TileDimensions.Width#">

			<!---
				Paste the tile image onto the target
				ColdFusion image at the given X,Y
				coordinate.
			--->
			<cfset ImagePaste(
				ARGUMENTS.Image,
				ARGUMENTS.TileImage,
				LOCAL.PasteCoord.X,
				LOCAL.PasteCoord.Y
				) />

		</cfloop>

	</cfloop>


	<!--- Return the updated image. --->
	<cfreturn ARGUMENTS.Image />
</cffunction>
Want to use code from this post? Check out the license.
Reader Comments